

Understanding Fluid Dynamics in Pulsatile Pump Systems: How We Simulate Real Blood Flow
It’s Time to Talk About Fluid Dynamics
At HumanX Medical, we design advanced pulsatile pump systems and patient-specific vascular models to replicate real physiological conditions for training, device development, and validation. When talking to users of our pumps and vascular models, there are questions that are asked more often than others:
“Why does the pressure on the pump’s display not match what I measure in the vascular model?”
“Why is the output volume lower than a real heart?”
“Why does the vascular model seem to inflate during pumping?”
These are valid questions — and they all have one thing in common: fluid dynamics.
Understanding how fluid behaves as it moves from the pump into a vascular model helps explain what’s happening and why your simulation behaves the way it does. In this article — the first in a five-part series — we focus on pressure behavior in connected systems.
Why Pressure Isn’t the Same Everywhere
From Pump Display to Vascular Model — Understanding Local Pressure Differences
Pressure at the Pump ≠ Pressure Inside the Model
One of the problems our customers come up with when using our Flowbox pump units, is ending up with a different fluid pressure in the connected vascular model compared to the pressure shown on the pump's display. We know it's frustrating, especially when you have invested in a high-quality product. Let's try to understand the problem and the basic fluid dynamics.
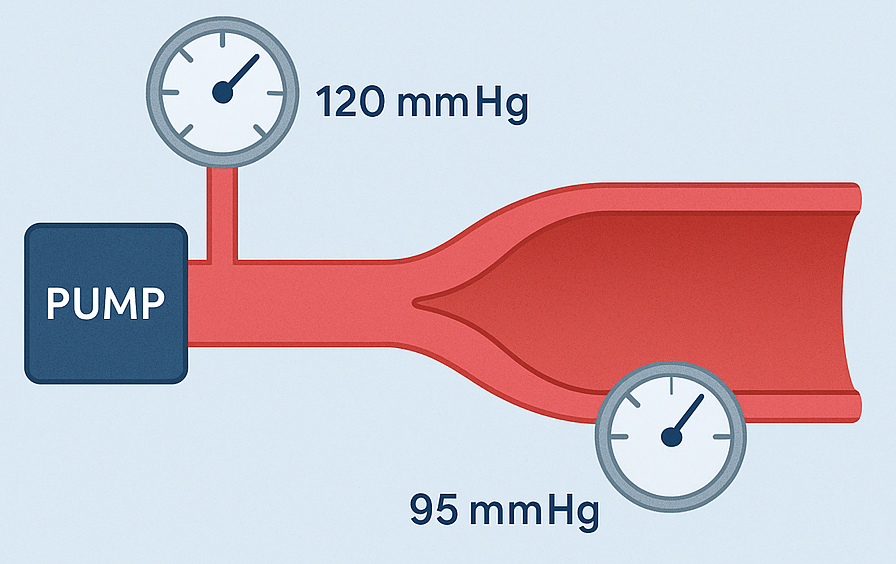
The pressure displayed on the pump’s screen is measured close to the outlet — typically at a connector with a 10 mm inner diameter. It tells you what the pump is producing at that point.
But once the fluid leaves the pump and enters the vascular model, things change. You might measure a much lower pressure within the model — especially in wide, compliant areas like a full-scale aorta. This is not an error — it's fluid physics.
But once the fluid leaves the pump and enters the vascular model, things change. You might measure a much lower pressure within the model — especially in wide, compliant areas like a full-scale aorta. This is not an error — it's fluid physics.
Where the Pressure Goes: Losses in the System
Fluid doesn't travel through the system without resistance. As it flows from the pump through tubing, connectors, and into the vascular model, it loses pressure due to:
Friction inside the tubing
Abrupt diameter changes (e.g., from 10 mm to 20 mm)
Turbulence, especially at junctions or tight curves
Energy conversion (e.g., pressure energy turning into kinetic energy or wall expansion)
Even though the flow rate remains the same, the static pressure inside the model drops along the way. The longer the tubing or the greater the expansion into larger vessels, the more pressure is lost.
The Role of Model Compliance
Our vascular models are designed to behave like real vessels — and real vessels are not rigid. They expand and contract with each pulse wave. This compliance is critical for realism, but it also affects how pressure behaves.
As fluid enters a flexible model, some of the pressure energy is absorbed by the vessel walls, causing them to expand. That energy doesn’t disappear — but it’s no longer available to increase internal pressure readings.
This is why the model may look "inflated" during operation, and why the internal pressure is lower than expected: the walls are doing their job, just like in the human body.
Why You Might Need to Set Higher Pump Pressures
To simulate a physiological pressure like 120 mmHg inside your e.g. aortic model, the pump often needs to be set above that value — sometimes significantly. This is necessary to:
Overcome resistance from tubing and connectors
Compensate for expansion in compliant vessel walls
Maintain desired flow rate through wider model sections

It’s similar to how the human heart works: it produces higher pressure at the source so that sufficient pressure remains after passing through the arteries and capillaries.
Takeaway
The pressure you see on the pump’s display is just one part of the story. As fluid moves through tubing, expands into larger vessels, and interacts with compliant model walls, it naturally loses pressure. This behavior isn’t a bug — it’s exactly how blood behaves in the human body.
If you're seeing lower-than-expected pressure inside your vascular model, you have two practical options:
Use a more rigid vascular model if wall expansion and flexibility isn’t essential for your application
Increase the pump pressure setting to compensate for fluid losses and compliance
Both approaches can help you achieve more accurate, physiological values at your target location within the model.
In the next article, we’ll dive into the laws of physics that govern these effects — including Bernoulli’s principle, flow continuity, and Poiseuille’s law — to help you better understand how flow rate, velocity, and vessel diameter interact to shape what you see in your simulation system.